Monday, March 25, 2013

Tasty Leftovers - Creamy Pork Baked Taquitos

Cheesy Pork Taquitos - BAKED
Creamy Pork Baked Taquitos
(Leave the pork out for a super Meatless Monday supper.)

I'm big on Mexican food.
It can be real Mexican food made lovingly by experienced hands.  We are blessed to have a lot of family-owned places where each dinner plate is made my the same person who took your order. The orders are taken with broken English and broken Spanish...and the food is made with love.

I'm also not above faking a little Mexican food at home.

But, when it come to taquitos, well I'm not huge on frying.  Yes, I've done some frying in the past.  Yet, I'm hesitant.  Oil takes time to warm up, you have to keep an eye on safety, and when you are done you have a choice to discard or re-use the oil.  And, I'm not thrilled with any of that, to be honest.

I'm looking for quick, tasty, inexpensive...with little cleanup.
And, I found it.

Tasty Leftovers - Mexican Food

I had some leftovers from our Braised Pulled Pork from the Low, Slow and So Worth It! series.  So, I popped over to Pinterest, where I knew I had tucked away a method for baked taquitos. I was inspired by a recipe from Seeded at the Table.  I used some of my favorite spices and my family really enjoyed dinner.

Creamy Pork Baked Taquitos
from Cooking at Cafe D
Makes 5-7 large taquitos

8 oz. Cream Cheese, softened
10 oz. Rotel Original Tomatoes and Chilies, drained
2 c. cooked pork, shredded 
1 c. of mozzarella cheese, shredded
1/4 tsp. ancho powder, cumin, or smoked paprika
1/4 tsp. garlic powder
1/4 tsp. onion powder
1 package of 10 inch burrito sized flour tortillas
olive oil
salt

Preheat the oven to 425 and line with a Silpat, parchment paper or foil.

Mix the chicken, cheeses and spices with the drained can of tomatoes.  Taste and add additional spices or salt, as you like.

Warm 2 to 3 tortillas in the microwave for about 20 seconds to make them easier to roll.  Spread 3-4 tablespoons of the pork mixture on the lower 1/3 of a tortilla.  Roll tightly.  Place the tortilla seam down on the pan - leaving space between each.  Repeat with remaining tortillas.  

Brush tops and sides lightly with olive oil.

Bake for 14-18 minutes - until the taquitos are golden.

Bonus - You can freeze these!  Follow the same recipe, but instead of baking them, place the pan in the freezer for 20 minutes.  Then remove them and place in a freezer bag.  To reheat, take them straight from the bag and place in an oven at 425 and bake for 14 - 18 minutes till golden.


Pin It

Saturday, March 16, 2013

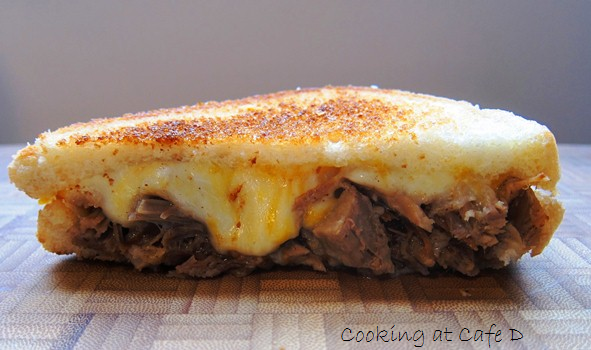
Grilled Cheese with Pulled Pork - Tasty Leftovers

Grilled Cheese with Pulled Pork

We love tasty leftovers at our house - mainly because we shake things up a bit. 
So, when we make something "Low, Slow and So Worth It"
for example some pulled pork
we try to be creative so it's not the same pulled pork sandwich every day. 

 (Actually we like pulled pork so much that'd be okay, too.)

This time it's an easy one.
Basically, it's your standard grilled cheese sandwich.
Grab a heavy pan - cast iron would work great here.

Take whatever your favorite bread is.
Here ours is a Brownberry Italian sliced bread.
(Ironic, after my recent post, no?)
Butter up two sides and place them butter side down.

Place some shredded cheese on one side of the bread.
I used a 4 cheese mix because that's what I had.
My fav for grilled cheese is cheddar and provolone.

On the other side, place some of the leftover pork.
After the bottoms toast and the cheese is melty, slap em together.

This will work great for leftover corned beef and cabbage, too!
I would used swiss, and smear a little brown mustard or horseradish under the meat.

What's YOUR favorite grilled cheese sammy?

Sharing with Natasha in Oz


Pin It

Thursday, March 14, 2013

Cart Buster Savings - Round 2!


 Saving Money on Groceries

Have you heard about the Kroger Cart Buster Sales Event?

From Pampers to Pantene, Tropicana to Tostitos - there's so much on sale.

Wanna save some money?
Here's the deal.  (Pardon the pun.)

Friday, March 15th, click HERE to get random digital coupons for even more in-store savings.  Everyone will be shown 3 deals and you can choose the one YOU want to use.  They will be delivered via load-to-card coupons onto your Kroger shopper card.  (You must have a Kroger.com account - then sign in to get the coupons.)

What kind of deals will be offered?
Well, the deals may include products such as Crest 3D White toothpaste, Tropicana orange juice, DiGiorno pizza, Secret deodorant, Pantene and more!

So, tell us...

Which deals did YOU get?

I was selected for this opportunity as a member of Clever Girls Collective
and the content and opinions expressed here are all my own. 


Pin It

Low & Slow #4 - Braised Pulled Pork

Pulled Pork - So Easy - via Cooking at Cafe D

Braised Pulled Pork - So Simple.

Nothing makes our home smell like love...than a pot of pork.
Well, perhaps bacon on a Sunday morning...wins out.
But, pulled pork comes a closed second.

This is #4 in our "Low, Slow...and So Worth It" series.

I'll let you in on a secret.

I made the pork above...in a rush.
I completely skipped the whole searing part.
I picked up the pork from the butcher.
Then I dropped it fat side up in the Dutch oven.

Sprinkled it with spices, tossed in some broth and a splash of vinegar.
Stuck the lid on and let it go.

My husband thought this might have been the best sandwich he's had.
So, I think I might skip the searing next time, too!

~~~~~~~~*~~~~~~~~

Braised Pulled Pork
from Cooking at Cafe D


5-6 lb pork shoulder (bone-in and with fat cap)
6 cups Chicken broth or water
2 T. dried thyme
Kosher salt
Black pepper
2 T. Apple cider vinegar
White wine - optional

Brown all sides in Dutch oven.  Remove to plate.  Deglaze pan with wine or water scraping fond bits from bottom of pan.  Add apple cider vinegar.  Remove from heat.  Place pork shoulder fat side up) back in pan.  Add broth until halfway up.  (The liquid should not cover the pork.)

Salt and pepper the top.  Add 1 t. salt to the liquid.  Add thyme to top of pork. Replace lid.
Braise at 350-375 for about 3.5 to 4 hours (until meat falls off bone.)  I usually let the meat reach about 200 - 205 degrees.  Pull meat out and cover.  Separate fat.  When pork is cool enough to handle, pull apart with 2 forks or fingers.  Add some of the liquid back to the pork.  Save remaining liquid to add later, as necessary. 

Enjoy!

What is your favorite leftover pork recipe?
Tell us here...or on Facebook!

Sharing with This Chick Cooks, Beyond the Picket Fence, Hope Studios, Butter Believer
 
Pin It

Monday, March 11, 2013

Easy No Knead Bread (Really!)

Easy No Knead Bread

You Can Do It!  No Knead Bread

I'm not a big fan of store bought bread. The soft white stuff, which my mom called "air bread," never made it into the shopping cart - no matter how much I wanted it to. Instead, Mom bought Brownberry Oven bread.

Now, I have NOTHING against with Brownberry Oven bread. Matter of fact, the nut bread rocks toasted with a smear of cinnamon butter or cream cheese. But, when everyone else in your class has a nice PB&J on "air bread" and you have apple-butter on whole wheat...well, yuck.

Home baked or artisanal breads are a completely different matter. I love a good crust. A couple of my aunts were great at making homemade bread when I was growing up. I'm guessing they learned from my Yia Yia in their native Greek.

Now, my mom didn't get the bread gene. She and yeast were not good friends. So, when she tried the bread a few times we simply painted the baked loaf with colorful patterns and used it for a doorstop. I joke. (As far as you know.)

I feared bread...until I worked in a commercial kitchen and made enough pizza dough to do it in my sleep. And, now I love the smell of a nice yeasty loaf.

I recently tried a "no-knead recipe" developed by Jim Lahey of Sullivan Street Bakery.
 (There is a nice video with Jim along with Mark Bittman at that link.) The process was very simple - it took no virtually no effort but quite a bit of time.  Most of it thought was simply allowing the bowl to rest on the counter.


I did the recipe twice. This No Knead variety makes a very wet dough.  Very wet. And, the first time I ended up working a lot of flour into the dough. The result was a round (and very pretty) loaf with a very tough (read: almost inedible) crust and a tight interior structure.

I decided to do a little research because my technique needed some help. I turned to a video with Peter Reinhart. His "Stretch and Fold Technique" worked nicely in my second attempt. The result was a flat loaf with a very pale Artisanal look (read: not the nicest to look at.) This time the crust was tasty and the crumb was softer and had fun air pockets. Apparently we were too busy eating it for me to get any photos.

Mom would have loved THIS "air bread!"

Now, the difference in the shape and color likely had more to do with the temp of the kitchen, numbers of hours the dough was allowed to rise, humidity, etc. There are many factors which Peter discusses in his books.

No Knead Bread (adapted from the New York Times recipe)

3 cups all-purpose or bread flour, more for dusting
¼ teaspoon instant yeast
1¼ teaspoons salt
Cornmeal or wheat bran as needed.

1. In a large bowl combine flour, yeast and salt. (I used half AP flour and half bread four.) Add 1 5/8 cups water, and stir until blended; dough will be shaggy and sticky. Cover bowl with plastic wrap. Let dough rest at least 12 hours, preferably about 18, at warm room temperature, about 70 degrees.

2. Dough is ready when its surface is dotted with bubbles. Lightly flour a work surface and place dough on it; sprinkle it with a little more flour and fold it over on itself once or twice. Cover loosely with plastic wrap and let rest about 15 minutes.

3. Using just enough flour to keep dough from sticking to work surface or to your fingers, gently and quickly shape dough into a ball. Generously coat a cotton towel (not terry cloth) with flour, wheat bran or cornmeal; put dough seam side down on towel and dust with more flour, bran or cornmeal. Cover with another cotton towel and let rise for about 2 hours. When it is ready, dough will be more than double in size and will not readily spring back when poked with a finger.

4. At least a half-hour before dough is ready, heat oven to 450 degrees. Put a 6- to 8-quart heavy covered pot (cast iron, enamel, Pyrex or ceramic) in oven as it heats. When dough is ready, carefully remove pot from oven. Slide your hand under towel and turn dough over into pot, seam side up; it may look like a mess, but that is O.K. Shake pan once or twice if dough is unevenly distributed; it will straighten out as it bakes. Cover with lid and bake 30 minutes, then remove lid and bake another 15 to 30 minutes, until loaf is beautifully browned. Cool on a rack.

Yield: One 1½-pound loaf.
~~~~~~~~*~~~~~~~~
Have you made No Knead Bread?
Chances are good that you have the ingredients.
Mix up a batch tonight and treat your family to home baked bread tomorrow!


Pin It

Friday, March 8, 2013

Cart Buster Savings Event!


 Saving Money on Groceries

Have you heard about the Kroger Cart Buster Sales Event?

From Pampers to Pantene, Tropicana to Tostitos - there's so much on sale.

Don't Have a Kroger near you? 
Don't fret!

I have a Kroger card.  We picked it up years ago when we were vacationing in the South.  Having the card saved us money.  It didn't matter whether we lived there or were visiting.

Turns out I have a secret Kroger store...

If you asked me last week whether there were any Kroger stores nearby, I would have said no.  But, I would have only been half-right.  You see, there are a whole MESS of stores in the Kroger Family of Stores.  For us, we have lots of Food 4 Less right nearby.


Wanna save some money?
Here's the deal.  (Pardon the pun.)

Today, March 8th, click HERE to get random digital coupons for even more in-store savings.  Everyone will be shown 3 deals and you can choose the one YOU want to use.  They will be delivered via load-to-card coupons onto your Kroger shopper card.  (You must have a Kroger.com account - then sign in to get the coupons.)

What kind of deals will be offered?
Well, the deals may include products such as Crest 3D White toothpaste, Tropicana orange juice, DiGiorno pizza, Secret deodorant, Pantene and more!

So, tell us...

Which deals did YOU get?

I was selected for this opportunity as a member of Clever Girls Collective
and the content and opinions expressed here are all my own. 


Pin It

Tuesday, March 5, 2013

Giveaway! The Bible Series on the History Channel


Where were you on Sunday night?

I can tell you... the premiere of this show was a big deal in our home.  How big?  Well, first I scheduled the DVR when my husband wasn't home. (Not on purpose, I just happened to do it when he was at work.)  Later we were watching something else and out of the blue he started to schedule The Bible.  Then we both got a text from the teenager asking whether we had scheduled the show to record.  Seriously.

We saw the trailer a few months ago in church and we've been psyched ever since. 

The show's premiere blasted the roof off at The History Channel on Sunday..and  a birdy told me it was a Trending Tag on Twitter for most of the night.  Very fun.

Did you miss the Premiere?  (There's still time!) 
The History Channel is running the first episode a few more times this week.  So, you can catch up before the second episode airs on Sunday.  There are 10 episodes in all.

Here's what to expect.
The Bible comes to life in History Channel's epic new series. From Genesis to Revelation, these unforgettable stories unfold through live action and cutting-edge computer-generated imagery, offering new insight into famous scenes and iconic characters. Created by producer Mark Burnett and featuring an international cast that includes Roma Downey, this 10-hour docudrama explores the sacred text’s most significant episodes, including Noah’s journey in the ark, the Exodus and the life of Jesus.


Ready for a Giveaway? 
Time for the fun part.
I'm been asked to host a giveaway for you sweet readers.
There are 3 official companion books to The Bible series.
They are:

   A Story of God and All of Us (HARDCOVER)
   A Story of God and All of Us (REFLECTIONS)
   A Story of God and All of Us (YOUNG READERS)

One randomly chosen winner will be sent one of the companion books.  The book will be sent directly to you from the great folks at The History Channel & The Bible.  They will randomly select the book you will receive.

The book will be shipped via UPS or FedEx - no P.O. Boxes, please.
United States shipping addresses only, please.

Let's keep it simple.
To enter, leave a comment with which character from the bible (or which story) you are most looking forward to seeing. 

How do I leave a comment?
CLICK on the BLUE button that says, "What are your thoughts?" then scroll down to leave a comment

Want more entries?
Simply leave another comment for each way you follow us - via Twitter, Facebook, Pinterest, G+, Linky follow, RSS or Reader, Subscribe via Email...you get the idea. (See the sidebar for additional links.)

Contest will be open through March 12, 2013 (Midnight, C.S.T.)
We have partnered with The History Channel for the post.


Pin It

Quick Chicken Quesadillas - Tasty Leftovers

Quick Chicken Quesadillas with Southwest Corn Soup

Quick Chicken Quesadillas

Looking to use up some leftovers from Dutch Oven Chicken?
Or, for that matter any protein - beef, pork, beans, you name it.

Grab some 9 or 10 inch "Burrito Sized" flour tortillas.  Brush one side of a tortilla with olive oil and lay in a skillet.  Add about 1/2 cup of cheese - more if you prefer.  Top with chicken.  (I usually add a bit more cheese on top of the chicken.) 

Brush a second tortilla with oil and place it oil side up. Use a spatula and press the top down as the cheese melts to seal the tortillas together.  
Peek under neath and flip over when golden brown and delicious.

Easy Chicken Quesadillas


What's cooking in your kitchen tonight?
 
Pin It

Sunday, March 3, 2013

Chicken Broccoli Pasta - Tasty Leftovers

Chicken Broccoli Pasta recipe
Chicken Broccoli Pasta

We had a lot of leftover meat from our Dutch Oven Chicken.  
We decided to lighten things up a bit with a pasta.

This is one of my favorite salads  because of How Quick and How Tasty it is. 
Boil up your favorite pasta, add whatever veggies you have on hand.

In this case it was chopped broccoli, some frozen spinach, and some marinated artichokes that had been drained.  Then add about half to 3/4 a jar of your favorite Alfredo sauce and salt and pepper to taste.  I usually add some additional garlic, too.

Good hot or cold.

Toss in some leftover chicken...or skip it if you are looking for an option for Meatless Monday.

What is veggies would you toss in your pasta?
Tell us here...or on Facebook!
 
Pin It

Saturday, March 2, 2013

Low & Slow #3: Dutch Oven Chicken

Easy Dutch Oven Chicken
Dutch Oven Chicken

And, now for our next installment of Low, Slow and So Worth It. Today we're talking turkey, well, actually chicken.  And, this is about as simple as it gets.  One pot, one chicken.  Add heat and a lid.

I took inspiration from two recipes.  The first is the French Chicken in a Pot from The Barefoot Cook. The second is from Lubbock Online. Both of those writers are actually riffing off the French Chicken in a Pot from Cook's Illustrated.

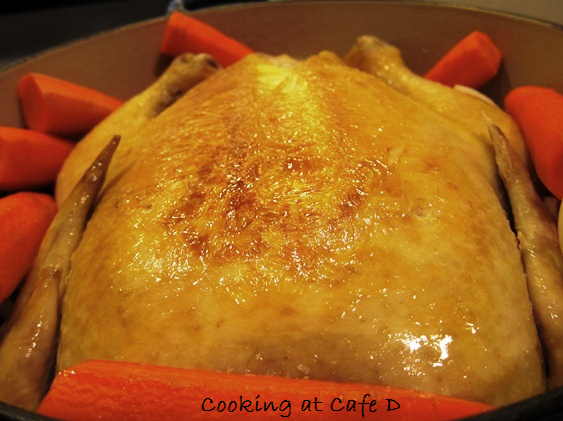
The picture above is the Before.  
Well, it's actually more of the During, really.  
 The chicken has some color on it but  it's still perfectly raw inside.  

The photo below is the After - herbs and salt were added to the bird and it was done cooking.  
I think the first photo is a bit prettier.  
But, don't just the finished chicken by her looks - she was darn juicy and tasty!


French Chicken in a Pot Cooks Illustrated Recipe

I was going to type out the recipe, but why bother.  All three of the sites listed above did a nice job.  If you have a subscription to Cook's Illustrated (or a their 30 day free trial) their link above will get you the original recipe.

Basically, take the thawed chicken and toss it breast-side down in a hot dutch oven for about 5 minutes to get some color on it.  Then carefully flip it over and toss some herbs and veggies in if you please.  Stick a lid on it and pop it in a 250 degree oven and cook it low and slow.

Cook until instant-read thermometer registers 160 degrees when inserted in thickest part of breast and 175 degrees in thickest part of thigh, 80 to 110 minutes.

For a 3 1/2- to 4 1/2-pound chicken it  will take about an hour to cook.  A 5- to 6-pound bird will take close to 2 hours.

As you can see from the pics above, I tossed some carrots in the pot.  Next time I won't bother.  I'll just make a sheet pan of slow roasted vegetables.

Have you ever made Dutch Oven Chicken?
What's your favorite use for leftover chicken?

Tell us here... or join us on Facebook.


Pin It
Related Posts Plugin for WordPress, Blogger...